Overview
- Quick link to Passenger App settings
- Creating app Zones
- Journey Distances
- General Settings
Setting Up Your Passenger App
Select “App Settings”, then “Add New”
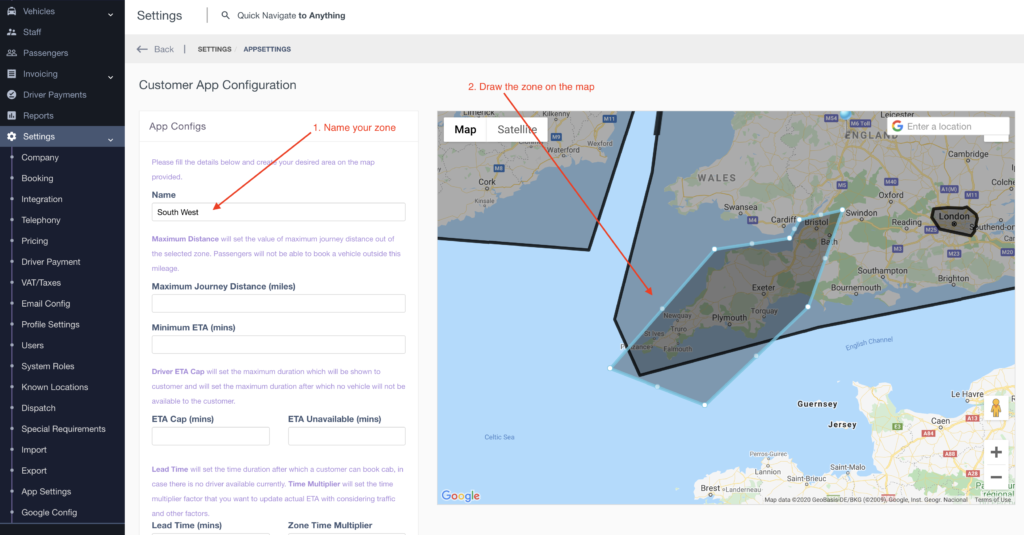
Then name your new zone, in this example “South West”, then draw your zone onto the map.

You can have as many zones as you want and they can be inside each other and overlapping. Many users have a zone around their local town and surrounding areas, but also another zone for the town center. The town center zone is often accurate and times are kept short, however, the next zone as you move out of town might have more relaxed settings to allow for extra traffic and have more room for error.
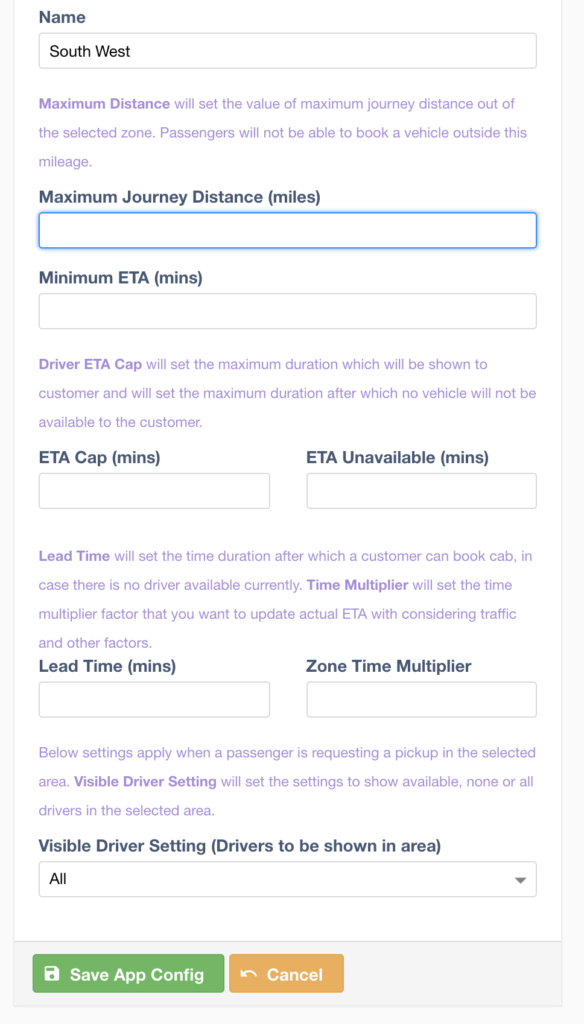
Now we need to complete the app configurations to represent the service you provide. The following fields need to be considered:

Maximum Journey Distance (miles) – Maximum Distance will set the maximum journey distance out of the selected zone. Passengers will not be able to book a vehicle outside this mileage. So if we entered 300 miles for the above South West Zone, you could book a vehicle from Taunton to Heathrow, but not from Taunton to Glasgow.
Minimum ETA (mins) – This can be blank or a value entered. If left blank the app will show how long you will have to wait for a vehicle. If you enter 10 mins and you are actually only 2 mins away, the app will still show 10 mins. This can be valuable for managing passenger expectations.
Driver ETA Cap (mins) – This will set the maximum duration which will be shown to the customer, it can be left blank or a value input. if you entered 25 into this box, but the actual eta was 40 mins, the app would only ever show 25 mins or less to the passenger.
Driver ETA Unavailable (mins) – This will set the maximum duration after which a vehicle will not be available to the customer. So if this was set to 90 mins and your driver was 91 mins away, the app would show no vehicles available.
Lead Time (mins) – This will set the time duration after which a customer can book a cab, in case there are no available drivers currently. So, you might enter 360, which means app users will only be able to book a vehicle a minimum of 6 hours in the future.
Time Multiplier – This setting will set the time multiplier factor that you want to update actual ETA, considering traffic and other factors. This can be changed at any time and will allow you to adjust times to be more realistic. So with nothing in this box the system will show actual eta’s. If we put 1.5 in this box, the system would multiple the eta by 1.5 so a 10 min eta would now show as 15 mins. This is a very valuable setting for busy periods.
Visible Driver Setting – Here you can select what vehicles to show as available to your customers. The options are to show available, none or all drivers in the selected area.
Next Steps
- Here is an article on inviting users to your app

